gutenberg
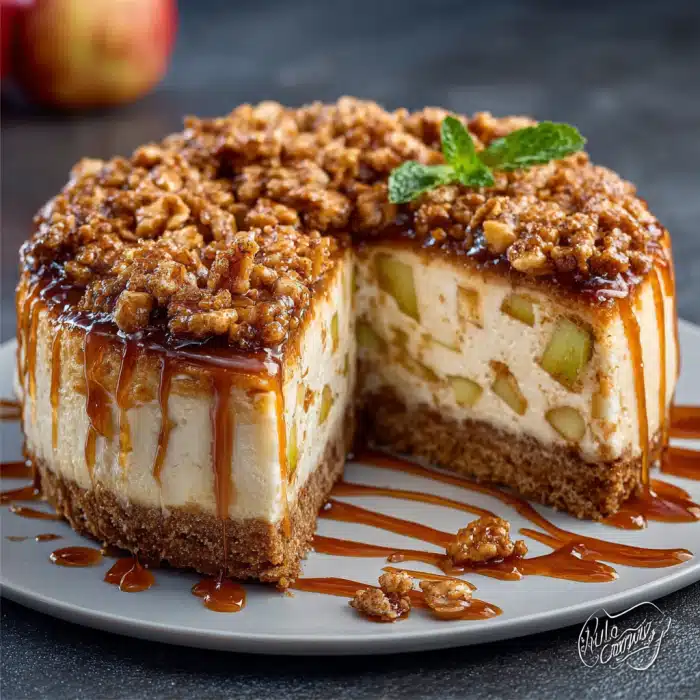
How to Make the Perfect Apple Crisp Cheesecake
Creating the ultimate Apple Crisp Cheesecake is a delightful journey that combines creamy textures with the warmth of spiced apples. I promise, this recipe is not only easy to follow but also incredibly rewarding. Let’s dive into the step-by-step process that will have your kitchen smelling like a cozy fall day!
Step 1 – Prep Your Ingredients Quickly
Before we start, I find it essential to have all my ingredients prepped and ready. This not only streamlines the cooking process but also makes it less stressful. So, gather your graham cracker crumbs, cream cheese, and those lovely apples. Trust me, having everything at your fingertips will make the experience much smoother!
Step 2 – Begin Cooking
First, preheat your oven to 325°F. In a medium bowl, combine the graham cracker crumbs, melted butter, and 1/4 cup of granulated sugar. This mixture will form the crust, providing a sweet crunch that perfectly complements the creamy filling. Press it firmly into the bottom of a 9-inch springform pan and bake for 10 minutes. The aroma of the baking crust is simply irresistible!
Step 3 – Combine Ingredients and Cook
While the crust cools, let’s whip up that luscious cheesecake filling. In a large mixing bowl, beat the softened cream cheese with 1 cup of granulated sugar and vanilla extract until smooth and creamy. Add the eggs one at a time, mixing well after each addition. Stir in the sour cream and ground cinnamon until fully incorporated. Pour half of this heavenly batter over the cooled crust, then layer the diced apples evenly on top. Finally, pour the remaining cheesecake batter over the apples, creating a beautiful, layered masterpiece.
Step 4 – Final Touches & Serving Suggestions
Now, for the crunchy topping! In a separate bowl, mix together the brown sugar, rolled oats, flour, and chopped nuts (if using), along with a pinch of ground nutmeg. Sprinkle this mixture evenly over the top of the cheesecake. Bake for 55-60 minutes, or until the center is set but still slightly jiggly. Once done, turn off the oven and crack the door, allowing the cheesecake to cool gradually for about an hour. This step is crucial for achieving that creamy texture we all love. After cooling, refrigerate for at least 4 hours, preferably overnight. When you’re ready to serve, slice and enjoy this delightful fall apple dessert!
Introduction to Apple Crisp Cheesecake
Welcome to the world of Apple Crisp Cheesecake, where creamy cheesecake meets the warm, spiced goodness of apples! This delightful fusion is not just a dessert; it’s an experience that captures the essence of fall in every bite. Imagine sinking your fork into a slice of velvety cheesecake, only to discover a layer of tender, cinnamon-kissed apples beneath a crunchy oat topping. It’s a symphony of textures and flavors that will leave you craving more.
What I love most about this recipe is its simplicity, making it the perfect fall apple dessert for busy lifestyles. With just a few steps, you can create a show-stopping dessert that’s ideal for family gatherings, potlucks, or even a cozy night in. The best part? You can prepare it ahead of time, allowing you to enjoy the moment without the stress of last-minute baking. So, let’s embrace the flavors of the season and dive into this easy-to-make Apple Crisp Cheesecake!
Why You’ll Love This Delicious Low-Carb Apple Dessert Recipe
One of the best things about this Apple Crisp Cheesecake is its convenience. You can easily make it ahead of time, which is a lifesaver for busy schedules. Whether you’re hosting a family dinner or attending a potluck, this dessert can be prepared a day in advance. Just pop it in the fridge, and you’ll have a stunning centerpiece ready to impress your guests!
The moment you take a bite, you’ll understand why this dessert is a crowd-pleaser. The rich, creamy texture of the cheesecake pairs beautifully with the tender, spiced apples, while the crunchy oat topping adds that perfect contrast. It’s like a warm hug on a plate, bringing comfort and joy to every gathering.
What I truly appreciate about this recipe is its simplicity. Even if you’re a novice baker, you’ll find the steps easy to follow. Experienced bakers will also enjoy the straightforward process, allowing them to focus on the fun part—enjoying the delicious results! So, whether you’re whipping this up for a special occasion or just to treat yourself, you’ll find that this Apple Crisp Cheesecake is as delightful to make as it is to eat.
Ingredients You’ll Need for This Recipe
To create the perfect Apple Crisp Cheesecake, you’ll need a handful of essential ingredients that work together to deliver a delightful flavor experience. Here’s what you’ll need:
- Graham cracker crumbs: The base for the crust, providing a sweet crunch that complements the creamy filling.
- Unsalted butter: This binds the crust together, adding a rich flavor that enhances the overall taste.
- Granulated sugar: Sweetens both the crust and the cheesecake, balancing the flavors beautifully.
- Cream cheese: The star of the show! This creamy base gives the cheesecake its luscious texture.
- Sour cream: Adds a delightful tanginess and creaminess, elevating the cheesecake to new heights.
- Diced apples: Provides the signature apple flavor and texture, making this dessert a true fall favorite.
- Rolled oats, brown sugar, and nuts: These ingredients create the crunchy topping that adds a satisfying contrast to the creamy cheesecake.
For those looking to mix things up, consider substituting the apples with pears or peaches for a different flavor profile. The versatility of this recipe allows you to experiment with seasonal fruits, making it a delightful treat year-round!
Don’t worry about memorizing everything right now; exact measurements will be provided at the end of the recipe for your convenience. Let’s get ready to bake this delicious Apple Crisp Cheesecake!
How to Make the Perfect Apple Crisp Cheesecake
Creating the ultimate Apple Crisp Cheesecake is a delightful journey that combines creamy textures with the warmth of spiced apples. I promise, this recipe is not only easy to follow but also incredibly rewarding. Let’s dive into the step-by-step process that will have your kitchen smelling like a cozy fall day!
Step 1 – Prep Your Ingredients Quickly
Before we start, I find it essential to have all my ingredients prepped and ready. This not only streamlines the cooking process but also makes it less stressful. So, gather your graham cracker crumbs, cream cheese, and those lovely apples. Trust me, having everything at your fingertips will make the experience much smoother!
Step 2 – Begin Cooking
First, preheat your oven to 325°F. In a medium bowl, combine the graham cracker crumbs, melted butter, and 1/4 cup of granulated sugar. This mixture will form the crust, providing a sweet crunch that perfectly complements the creamy filling. Press it firmly into the bottom of a 9-inch springform pan and bake for 10 minutes. The aroma of the baking crust is simply irresistible!
Step 3 – Combine Ingredients and Cook
While the crust cools, let’s whip up that luscious cheesecake filling. In a large mixing bowl, beat the softened cream cheese with 1 cup of granulated sugar and vanilla extract until smooth and creamy. Add the eggs one at a time, mixing well after each addition. Stir in the sour cream and ground cinnamon until fully incorporated. Pour half of this heavenly batter over the cooled crust, then layer the diced apples evenly on top. Finally, pour the remaining cheesecake batter over the apples, creating a beautiful, layered masterpiece.
Step 4 – Final Touches & Serving Suggestions
Now, for the crunchy topping! In a separate bowl, mix together the brown sugar, rolled oats, flour, and chopped nuts (if using), along with a pinch of ground nutmeg. Sprinkle this mixture evenly over the top of the cheesecake. Bake for 55-60 minutes, or until the center is set but still slightly jiggly. Once done, turn off the oven and crack the door, allowing the cheesecake to cool gradually for about an hour. This step is crucial for achieving that creamy texture we all love. After cooling, refrigerate for at least 4 hours, preferably overnight. When you’re ready to serve, slice and enjoy this delightful fall apple dessert!
Expert Tips to Ensure Keto Cooking Success
As a passionate home cook, I’ve learned a few tricks along the way to ensure that my Apple Crisp Cheesecake turns out perfectly every time. Here are my top tips for achieving the best results:
- Use room temperature cream cheese: This is crucial for a smoother batter. Cold cream cheese can lead to lumps, making your cheesecake less creamy. Take it out of the fridge at least an hour before you start baking.
- Don’t overmix the batter: While it’s tempting to whip it into a frenzy, overmixing can introduce too much air, leading to cracks in your cheesecake. Mix just until combined for a smooth, even texture.
- Allow the cheesecake to cool gradually in the oven: After baking, turn off the oven and crack the door open. This gradual cooling process helps prevent sudden temperature changes that can cause cracks. It’s a simple step that makes a world of difference in achieving that creamy texture we all love!
By following these expert tips, you’ll be well on your way to creating a stunning Apple Crisp Cheesecake that will impress your family and friends. Happy baking!
Essential Kitchen Tools for This Keto Recipe
To make your Apple Crisp Cheesecake a success, having the right kitchen tools is essential. Here’s a list of the necessary tools you’ll need:
- 9-inch springform pan: This is crucial for easy removal of your cheesecake once it’s baked. If you don’t have a springform pan, a regular cake pan will work, but be prepared for a bit more effort when serving.
- Mixing bowls: A set of mixing bowls in various sizes will help you keep your ingredients organized and make the mixing process smoother.
- Electric mixer or whisk: An electric mixer is ideal for achieving that creamy cheesecake texture, but a good old-fashioned whisk will do the trick if you prefer a workout!
- Measuring cups and spoons: Accurate measurements are key to baking success, so make sure you have a reliable set on hand.
- Baking sheet: This is useful for catching any drips from your springform pan while baking, ensuring a clean oven.
If you’re missing any of these tools, don’t worry! You can often find alternatives around your kitchen. For instance, a large glass dish can substitute for a springform pan, and a hand whisk can replace an electric mixer in a pinch. Just remember, the goal is to create a delicious Apple Crisp Cheesecake, and with a little creativity, you can make it happen!
Delicious Variations to Customize Your Cheesecake

One of the best things about the Apple Crisp Cheesecake is its versatility. You can easily customize it to suit your taste or to use up seasonal fruits. Here are some delightful variations to consider:
- Add caramel sauce: For a sweet twist, drizzle some caramel sauce over the top before serving. The rich, buttery flavor pairs beautifully with the creamy cheesecake and spiced apples, creating a decadent treat that’s hard to resist.
- Substitute apples with seasonal fruits: While apples are the star of this recipe, feel free to switch things up! Try using pears or peaches for a different flavor profile. Each fruit brings its unique sweetness and texture, making your cheesecake a delightful surprise.
- Experiment with different nuts or spices: If you want to add a little crunch or a flavor boost, consider using different nuts like almonds or pecans in your topping. You can also play around with spices—adding a pinch of ginger or allspice can elevate the flavor and give your cheesecake a unique twist.
These variations not only keep things interesting but also allow you to tailor the Apple Crisp Cheesecake to your preferences. So, don’t hesitate to get creative and make this recipe your own!
Best Keto-Friendly Sides & Beverage Pairings
When it comes to enjoying your Apple Crisp Cheesecake, pairing it with the right sides and beverages can elevate the experience to new heights. Here are some easy, keto-friendly options that complement this delightful dessert:
- Whipped cream or sugar-free whipped topping: A dollop of whipped cream adds a light, airy texture that beautifully contrasts the creamy cheesecake. Opt for a sugar-free version to keep it keto-friendly!
- Fresh berries: Serve your cheesecake with a side of fresh berries, such as raspberries or strawberries. Their tartness provides a refreshing contrast to the sweetness of the cheesecake, making each bite a burst of flavor.
- Herbal teas or coffee: A warm cup of herbal tea or a rich coffee can enhance the dessert experience. The warmth of the beverage complements the cozy flavors of the cheesecake, making it a perfect ending to your meal.
These simple pairings not only enhance the flavors of your Apple Crisp Cheesecake but also keep your meal aligned with your keto lifestyle. Enjoy the delightful combination of tastes and textures as you savor every bite!
FAQs About Making Apple Crisp Cheesecake at Home
As you embark on your journey to create the perfect Apple Crisp Cheesecake, you might have a few questions. Here are some common queries I’ve encountered, along with my answers to help you navigate the process smoothly:
- Can I make this cheesecake ahead of time? Absolutely! In fact, making it a day in advance is a great idea. This allows the flavors to meld beautifully, and it gives you one less thing to worry about on the day of your gathering.
- How do I store leftovers? If you have any leftovers (which is rare!), store them in an airtight container in the refrigerator. The cheesecake will stay fresh for up to 5 days. Just remember to cover it well to prevent it from absorbing any odors from the fridge.
- Can I freeze the cheesecake? Yes, you can freeze the Apple Crisp Cheesecake! Wrap it tightly in plastic wrap and then in aluminum foil to prevent freezer burn. It can be frozen for up to 2 months. When you’re ready to enjoy it, simply thaw it in the refrigerator overnight.
- What can I use instead of cream cheese? If you’re looking for a substitute, you can use mascarpone cheese for a similar creamy texture. Alternatively, a vegan cream cheese can work well if you’re aiming for a dairy-free option. Just keep in mind that the flavor may vary slightly.
These FAQs should help clarify any concerns you might have as you prepare to make your Apple Crisp Cheesecake. Happy baking!
Final Thoughts on This Easy Keto-Friendly Apple Crisp Cheesecake
As I reflect on the joy of making this Apple Crisp Cheesecake, I can’t help but smile at the memories it creates. The process of blending creamy cheesecake with spiced apples and a crunchy topping is not just about baking; it’s about bringing people together. Each slice is a celebration of flavors that warms the heart and fills the home with delightful aromas.
I encourage you to try this recipe and experience the magic for yourself. Whether you’re sharing it with family during a cozy fall gathering or enjoying a quiet evening at home, this dessert is sure to impress. And don’t forget to share your experiences! I’d love to hear how your Apple Crisp Cheesecake turns out and any creative twists you add along the way. Let’s foster a community of passionate home cooks who celebrate the joy of baking together!
“`
PrintApple Crisp Cheesecake: Discover the Ultimate Recipe!

A delicious blend of creamy cheesecake and spiced apples, topped with a crunchy oat topping, perfect for fall.
- Prep Time: 30 minutes
- Cook Time: 1 hour
- Total Time: 5 hours 30 minutes (including cooling and chilling time)
- Yield: 10 servings 1x
- Category: Dessert
- Method: Baking
- Cuisine: American
- Diet: Vegetarian
Ingredients
- 2 cups graham cracker crumbs
- 1/2 cup unsalted butter, melted
- 1/4 cup granulated sugar
- 2 (8-ounce) packages cream cheese, softened
- 1 cup granulated sugar
- 1 teaspoon vanilla extract
- 3 large eggs
- 1 cup sour cream
- 1 teaspoon ground cinnamon
- 2 cups peeled and diced apples (such as Granny Smith or Honeycrisp)
- 1/2 cup brown sugar
- 1/2 cup rolled oats
- 1/4 cup all-purpose flour
- 1/4 cup chopped walnuts or pecans (optional)
- 1/2 teaspoon ground nutmeg
Instructions
- Preheat the oven to 325°F.
- In a medium bowl, combine graham cracker crumbs, melted butter, and 1/4 cup granulated sugar. Press the mixture firmly into the bottom of a 9-inch springform pan to form the crust.
- Bake for 10 minutes, then remove from the oven and let cool.
- In a large mixing bowl, beat the softened cream cheese with 1 cup granulated sugar and vanilla extract until smooth and creamy.
- Add the eggs one at a time, mixing well after each addition.
- Stir in the sour cream and ground cinnamon until fully incorporated.
- Pour half of the cheesecake batter over the cooled crust.
- Layer the diced apples evenly over the batter, then pour the remaining cheesecake batter on top.
- In a separate bowl, mix together the brown sugar, rolled oats, flour, chopped nuts (if using), and ground nutmeg. Sprinkle this mixture evenly over the top of the cheesecake.
- Bake the cheesecake for 55-60 minutes, or until the center is set but slightly jiggly.
- Turn off the oven and crack the door, letting the cheesecake cool in the oven for 1 hour.
- Remove from the oven and refrigerate for at least 4 hours, preferably overnight.
- Slice and serve chilled.
Notes
- For a caramel twist, drizzle caramel sauce over the cheesecake before serving.
- You can substitute the apples with pears or peaches for a different flavor profile.
Nutrition
- Serving Size: 1 slice
- Calories: 350
- Sugar: 30g
- Sodium: 200mg
- Fat: 22g
- Saturated Fat: 12g
- Unsaturated Fat: 10g
- Trans Fat: 0g
- Carbohydrates: 30g
- Fiber: 1g
- Protein: 6g
- Cholesterol: 90mg


Leave a Comment