gutenberg
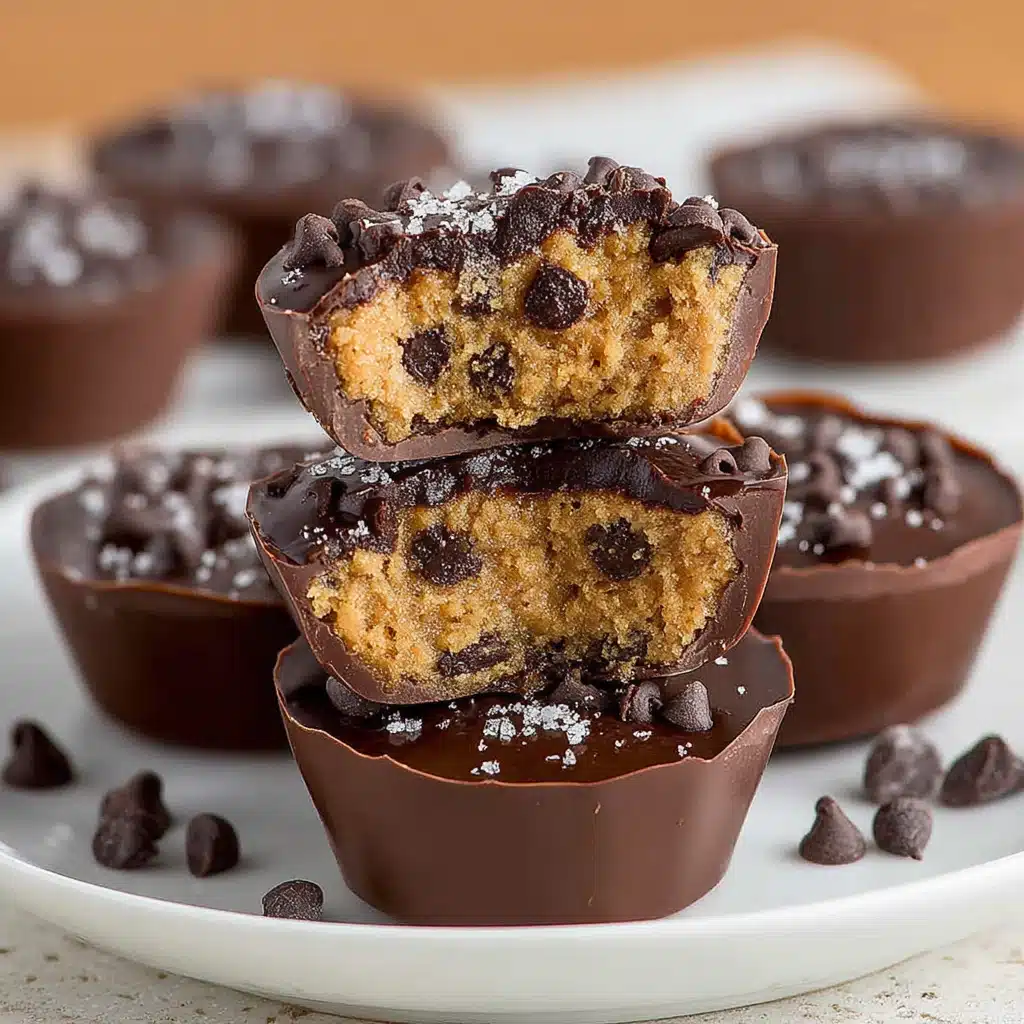
How to Make the Perfect Chocolate Chip Cookie Dough Cups
Making Chocolate Chip Cookie Dough Cups is a delightful experience that brings the joy of baking right into your kitchen without the need for an oven. I love how this no-bake dessert allows me to whip up something sweet in no time, especially on those busy days when I crave a treat but don’t have hours to spare. Let’s dive into the step-by-step process!
Step 1 – Prep Your Ingredients Quickly
Before you start mixing, gather all your ingredients. Having everything ready not only saves time but also makes the process smoother. I often lay out my ingredients on the counter, which helps me visualize the steps ahead. This little trick keeps me organized and focused, especially when I’m juggling a busy schedule.
Step 2 – Begin Mixing the Dough
In a large bowl, cream together the softened butter, brown sugar, and granulated sugar until the mixture is light and fluffy. The aroma of the butter and sugar blending together is simply heavenly! Once you add the vanilla extract, the scent becomes even more inviting. This step is crucial as it creates the base for your edible cookie dough dessert.
Step 3 – Form the Cookie Dough Balls
Now comes the fun part! Scoop tablespoon-sized portions of the dough and roll them into balls. I find that using a cookie scoop helps achieve uniformity, making each Chocolate Chip Cookie Dough Cup look as good as it tastes. Place the dough balls on a parchment-lined baking sheet, ensuring they have enough space to chill without sticking together.
Step 4 – Coat with Chocolate and Chill
While the dough balls are chilling, melt the chocolate chips in a microwave-safe bowl. I recommend doing this in 30-second intervals, stirring in between until smooth. This method prevents the chocolate from burning and ensures a silky coating. Once the dough balls are firm, dip each one into the melted chocolate, making sure they are fully coated. Afterward, place them back on the parchment-lined baking sheet and refrigerate for at least 30 minutes to set the chocolate. The anticipation builds as you wait for these chocolate cup treats to be ready!
Introduction to Chocolate Chip Cookie Dough Cups
As a busy home cook, I know how challenging it can be to find time for a sweet treat that fits into a health-conscious lifestyle. That’s where my Chocolate Chip Cookie Dough Cups come in! These delightful no-bake desserts are not only quick to prepare but also satisfy your sweet tooth without the guilt. With their rich, creamy texture and chocolatey goodness, they’re perfect for those hectic days when you crave something indulgent yet keto-friendly. Let’s explore how these edible cookie dough desserts can become your new go-to treat!
Why You’ll Love This Delicious Low-Carb Dessert
When it comes to satisfying my sweet cravings, Chocolate Chip Cookie Dough Cups are a game changer. They’re not just a treat; they’re a lifesaver for busy days! With their no-bake nature, I can whip them up in a flash, making them perfect for those moments when I need a quick dessert fix.
The taste? Oh, it’s simply divine! Imagine biting into a creamy, rich cookie dough center, perfectly complemented by a smooth chocolate coating. Each bite is a delightful explosion of flavor that transports me back to my childhood, where cookie dough was the ultimate indulgence. Plus, knowing that these treats are low in carbs makes them even more enjoyable!
What I love most is their simplicity. The recipe requires minimal ingredients and effort, allowing me to spend less time in the kitchen and more time enjoying life. Whether I’m hosting friends or just treating myself, these cookie dough cups are always a hit. They’re versatile too! You can easily customize them with different mix-ins or toppings, making them a fun and creative dessert option.
In a world where time is precious, these edible cookie dough desserts offer a sweet escape without the hassle. Trust me, once you try them, you’ll understand why they’ve become a staple in my home!
Ingredients You’ll Need for This Recipe
Gathering the right ingredients is essential for creating the perfect Chocolate Chip Cookie Dough Cups. Here’s what you’ll need:
- 1 cup all-purpose flour: This forms the base of your cookie dough. For a keto-friendly alternative, consider using almond flour.
- 1/2 teaspoon baking soda: This helps the dough rise slightly, giving it a light texture.
- 1/4 teaspoon salt: A pinch of salt enhances the sweetness and balances the flavors.
- 1/2 cup unsalted butter, softened: Butter adds richness and creaminess to the dough.
- 1/2 cup brown sugar, packed: This gives the cookie dough its signature sweetness and a hint of molasses flavor.
- 1/4 cup granulated sugar: For added sweetness and a slight crunch.
- 1 teaspoon vanilla extract: This adds a warm, aromatic flavor that complements the chocolate.
- 1 cup semi-sweet chocolate chips: These are mixed into the dough for that classic cookie dough taste.
- 1/4 cup milk (or dairy-free alternative): This helps bind the dough together. Almond or coconut milk works well for a dairy-free option.
- 1 cup chocolate chips (for coating): This creates a delicious outer layer that makes these cookie dough cups irresistible.
Feel free to get creative! You can substitute the semi-sweet chocolate chips with white chocolate or peanut butter chips for a different flavor profile. And if you want to add a fun twist, sprinkle a pinch of sea salt on top of the chocolate before it sets for a delightful salted caramel flavor.
Now that you have your ingredients ready, let’s move on to the fun part—making these delicious treats!
How to Make the Perfect Chocolate Chip Cookie Dough Cups
Making Chocolate Chip Cookie Dough Cups is a delightful experience that brings the joy of baking right into your kitchen without the need for an oven. I love how this no-bake dessert allows me to whip up something sweet in no time, especially on those busy days when I crave a treat but don’t have hours to spare. Let’s dive into the step-by-step process!
Step 1 – Prep Your Ingredients Quickly
Before you start mixing, gather all your ingredients. Having everything ready not only saves time but also makes the process smoother. I often lay out my ingredients on the counter, which helps me visualize the steps ahead. This little trick keeps me organized and focused, especially when I’m juggling a busy schedule.
Step 2 – Begin Mixing the Dough
In a large bowl, cream together the softened butter, brown sugar, and granulated sugar until the mixture is light and fluffy. The aroma of the butter and sugar blending together is simply heavenly! Once you add the vanilla extract, the scent becomes even more inviting. This step is crucial as it creates the base for your edible cookie dough dessert.
Step 3 – Form the Cookie Dough Balls
Now comes the fun part! Scoop tablespoon-sized portions of the dough and roll them into balls. I find that using a cookie scoop helps achieve uniformity, making each Chocolate Chip Cookie Dough Cup look as good as it tastes. Place the dough balls on a parchment-lined baking sheet, ensuring they have enough space to chill without sticking together.
Step 4 – Coat with Chocolate and Chill
While the dough balls are chilling, melt the chocolate chips in a microwave-safe bowl. I recommend doing this in 30-second intervals, stirring in between until smooth. This method prevents the chocolate from burning and ensures a silky coating. Once the dough balls are firm, dip each one into the melted chocolate, making sure they are fully coated. Afterward, place them back on the parchment-lined baking sheet and refrigerate for at least 30 minutes to set the chocolate. The anticipation builds as you wait for these chocolate cup treats to be ready!
Expert Tips to Ensure No-Bake Dessert Success
Creating the perfect Chocolate Chip Cookie Dough Cups is all about the details. Here are some expert tips I’ve gathered over the years to ensure your no-bake dessert turns out flawlessly:
- Use Room Temperature Ingredients: Make sure your butter is softened to room temperature. This helps achieve a creamy texture when mixing, which is essential for a smooth cookie dough.
- Measure Flour Accurately: Spoon the flour into your measuring cup and level it off with a knife. This prevents using too much flour, which can lead to a dry dough.
- Chill the Dough Balls: Don’t skip the chilling step! Freezing the dough balls for at least 30 minutes helps them hold their shape when coated in chocolate.
- Stir Chocolate Gently: When melting chocolate, stir gently to avoid incorporating air bubbles, which can affect the smoothness of your coating.
- Experiment with Mix-Ins: Feel free to add nuts, dried fruit, or different types of chocolate chips to customize your cookie dough cups. This adds a fun twist to the classic recipe!
- Store Properly: Keep your finished cookie dough cups in an airtight container in the refrigerator. They can last up to a week, but I doubt they’ll last that long!
With these tips in mind, you’ll be well on your way to mastering these delicious edible cookie dough desserts. Happy cooking!
Essential Kitchen Tools for This No-Bake Treat
To make your Chocolate Chip Cookie Dough Cups a breeze, having the right kitchen tools on hand is essential. Here’s a list of must-have items that will streamline your process:
- Mixing Bowls: A set of various sizes is ideal for mixing ingredients. Glass or stainless steel bowls are great options for durability.
- Measuring Cups and Spoons: Accurate measurements are key to success. Invest in a good set to ensure your ingredients are spot on.
- Cookie Scoop: This handy tool helps portion out your dough evenly, ensuring uniform cookie dough balls. If you don’t have one, a tablespoon works too!
- Parchment Paper: Line your baking sheet with parchment paper to prevent sticking and make cleanup a breeze.
- Microwave-Safe Bowl: For melting chocolate, a microwave-safe bowl is essential. Glass or ceramic bowls work best for even heating.
- Spatula: A silicone spatula is perfect for mixing and scraping down the sides of your bowls, ensuring no ingredient goes to waste.
- Refrigerator or Freezer: You’ll need space to chill your dough balls and set the chocolate coating. Make sure your fridge is ready for these delicious treats!
With these essential tools, you’ll be well-equipped to whip up your no-bake cookie dough masterpiece in no time!
Delicious Variations to Customize Your Cookie Dough Cups

One of the best things about Chocolate Chip Cookie Dough Cups is their versatility! You can easily customize them to suit your taste preferences or dietary needs. Here are some delightful variations to consider:
- Nutty Delight: Add 1/2 cup of chopped nuts, such as walnuts or pecans, to the dough for a crunchy texture and added flavor. Nuts not only enhance the taste but also provide healthy fats!
- Peanut Butter Swirl: Mix in 1/4 cup of creamy peanut butter into the dough for a rich, nutty flavor. You can also drizzle some melted peanut butter on top of the chocolate coating for an extra treat.
- Mint Chocolate Chip: Incorporate 1/2 teaspoon of peppermint extract into the dough and use dark chocolate chips for a refreshing minty twist. This variation is perfect for the holidays!
- Cookie Dough Brownie Cups: For a decadent twist, layer brownie batter in the bottom of your cups before adding the cookie dough. Bake the brownie layer first, then top with the cookie dough and chocolate coating.
- Vegan Option: Substitute the butter with coconut oil and use a plant-based milk alternative. Replace the chocolate chips with dairy-free chocolate chips to create a delicious vegan version of these treats.
- Seasonal Flavors: Experiment with seasonal spices like cinnamon or pumpkin spice during the fall. Just add a teaspoon of your favorite spice to the dough for a festive touch!
These variations not only keep things exciting but also allow you to cater to different dietary preferences. Feel free to mix and match ingredients to create your own signature edible cookie dough dessert!
Best Keto-Friendly Sides & Beverage Pairings
To elevate your experience with Chocolate Chip Cookie Dough Cups, consider pairing them with these delicious keto-friendly sides and beverages. Each option complements the rich flavors of your no-bake dessert while keeping your carb count in check:
- Fresh Berries: A small bowl of raspberries or strawberries adds a refreshing contrast to the sweetness of the cookie dough cups.
- Cheese Platter: Serve a selection of cheeses, such as brie or cheddar, for a savory balance that enhances the overall flavor experience.
- Nut Mix: A handful of mixed nuts, like almonds and pecans, provides a satisfying crunch and healthy fats to keep you full.
- Dark Chocolate: Pair your cookie dough cups with a few squares of high-quality dark chocolate (85% cocoa or higher) for a rich, indulgent treat.
- Low-Carb Ice Cream: Enjoy a scoop of keto-friendly ice cream, such as vanilla or chocolate, for a creamy side that complements the cookie dough perfectly.
- Herbal Tea: A warm cup of herbal tea, like chamomile or peppermint, offers a soothing beverage option that pairs well with dessert.
- Almond Milk Latte: For a caffeine boost, try an almond milk latte sweetened with a sugar substitute. It’s a delightful way to enjoy your cookie dough cups!
These pairings not only enhance your dessert experience but also keep your meal balanced and satisfying. Enjoy your edible cookie dough dessert with these delicious accompaniments!
FAQs About Making Chocolate Chip Cookie Dough Cups at Home
As I’ve shared my love for Chocolate Chip Cookie Dough Cups, I often get questions about this delightful no-bake treat. Here are some of the most common inquiries I receive, along with my answers to help you create the perfect edible cookie dough dessert!
- Can I use gluten-free flour for this recipe?
Absolutely! You can substitute all-purpose flour with a gluten-free blend or almond flour to make these chocolate cup treats suitable for a gluten-free diet. - How long do these cookie dough cups last?
When stored in an airtight container in the refrigerator, your Chocolate Chip Cookie Dough Cups can last up to a week. However, I doubt they’ll last that long! - Can I freeze the cookie dough balls before coating them?
Yes! Freezing the dough balls before coating them in chocolate is a great idea. Just make sure to let them thaw slightly before dipping to ensure the chocolate adheres well. - What can I use instead of chocolate chips for coating?
If you want to switch things up, you can use white chocolate or even peanut butter chips for coating your no-bake cookie dough. Just melt them the same way as the chocolate chips! - Are there any low-carb alternatives for the sugars?
Definitely! You can use erythritol or monk fruit sweetener as a low-carb substitute for brown and granulated sugar, making your edible cookie dough dessert even more keto-friendly.
Final Thoughts on This Easy No-Bake Dessert
As I reflect on my journey with Chocolate Chip Cookie Dough Cups, I can’t help but smile at how this simple recipe has become a cherished favorite in my home. It’s more than just a treat; it’s a reminder that indulgence can be quick, easy, and guilt-free. Whether you’re treating yourself after a long day or impressing friends at a gathering, these edible cookie dough desserts are sure to delight. So, why not give them a try? I promise, once you take that first bite, you’ll be hooked! Happy cooking!
“`
PrintChocolate Chip Cookie Dough Cups: Discover a Sweet Treat!

Chocolate Chip Cookie Dough Cups are a delicious no-bake treat that combines edible cookie dough with a chocolate coating, perfect for satisfying your sweet tooth.
- Prep Time: 15 minutes
- Cook Time: 0 minutes
- Total Time: 1 hour 15 minutes
- Yield: 12 servings 1x
- Category: Dessert
- Method: No Bake
- Cuisine: American
- Diet: Vegetarian
Ingredients
- 1 cup all-purpose flour
- 1/2 teaspoon baking soda
- 1/4 teaspoon salt
- 1/2 cup unsalted butter, softened
- 1/2 cup brown sugar, packed
- 1/4 cup granulated sugar
- 1 teaspoon vanilla extract
- 1 cup semi-sweet chocolate chips
- 1/4 cup milk (or dairy-free alternative)
- 1 cup chocolate chips (for coating)
Instructions
- In a medium bowl, whisk together the flour, baking soda, and salt. Set aside.
- In a large bowl, cream together the softened butter, brown sugar, and granulated sugar until light and fluffy. Mix in the vanilla extract.
- Gradually add the flour mixture to the butter mixture, mixing until just combined. Stir in the semi-sweet chocolate chips and milk until the dough is well combined.
- Scoop tablespoon-sized portions of the dough and roll them into balls. Place them on a parchment-lined baking sheet and freeze for about 30 minutes.
- While the dough balls are chilling, melt the chocolate chips in a microwave-safe bowl in 30-second intervals, stirring in between until smooth.
- Once the dough balls are firm, dip each one into the melted chocolate, ensuring they are fully coated. Place them back on the parchment-lined baking sheet.
- Refrigerate the chocolate-covered dough balls for at least 30 minutes to set the chocolate.
- Serve chilled or at room temperature.
Notes
- For a fun twist, try adding a pinch of sea salt on top of the chocolate before it sets for a salted caramel flavor.
- You can substitute the semi-sweet chocolate chips with white chocolate or peanut butter chips for a different taste.
Nutrition
- Serving Size: 1 cup
- Calories: 180
- Sugar: 10g
- Sodium: 50mg
- Fat: 10g
- Saturated Fat: 6g
- Unsaturated Fat: 4g
- Trans Fat: 0g
- Carbohydrates: 18g
- Fiber: 0g
- Protein: 2g
- Cholesterol: 20mg


Leave a Comment